How to Build an Expense Tracker in Google Sheets
Build an expense tracker in Google Sheets with categories, monthly totals, and a free template method, then attach every receipt to its own row.
The end of the month arrives and the question is always the same: where did it all go?
An expense tracker answers that, and you don’t need an app or a subscription to build one. Google Sheets does it cleanly, and you stay in control of your own numbers.
This guide builds an expense tracker Google Sheets updates as you log: categorized expenses, running totals, and a monthly breakdown that shows your habits at a glance.
Key Highlights
- A Google Sheets expense tracker is one log of spending with a category on every row.
- Track each expense with date, merchant, category, payment method, and amount.
- SUMIF totals spending by category, and a helper month column gives you clean monthly totals.
- Category dropdowns stop typos from splitting your totals.
- A row can hold the amount, but not the proof. UpSheet is a Google Sheets extension by The Conductor that lets you attach the receipt directly to each expense’s row, which is exactly what you need at tax time or for reimbursements.
What columns does an expense tracker Google Sheets build need?
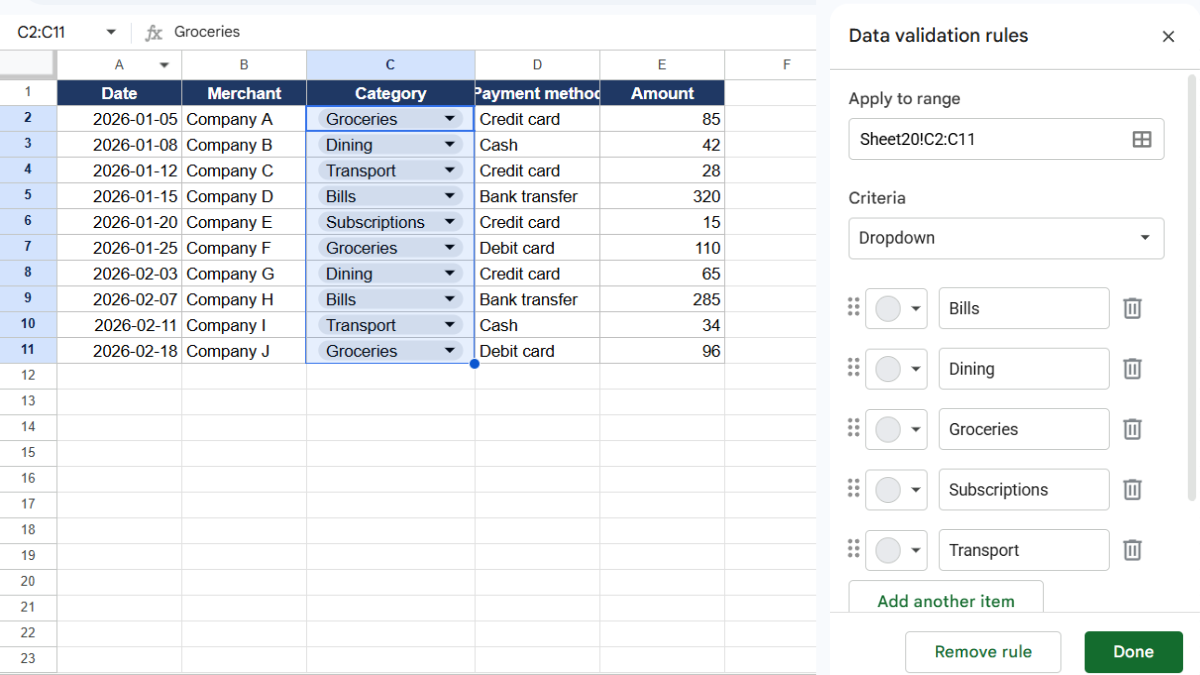
Keep it simple enough that logging an expense takes five seconds. Open a new Google Sheet and add these headers:
- Date (A)
- Merchant (B)
- Category (C)
- Payment method (D)
- Amount (E)
Then make Category a dropdown: select column C, go to Data → Data validation, add a Dropdown, and list categories like Groceries, Dining, Transport, Bills, and Subscriptions.
Consistent categories are the whole game. They’re what make your totals mean something.
How do you total spending by category?
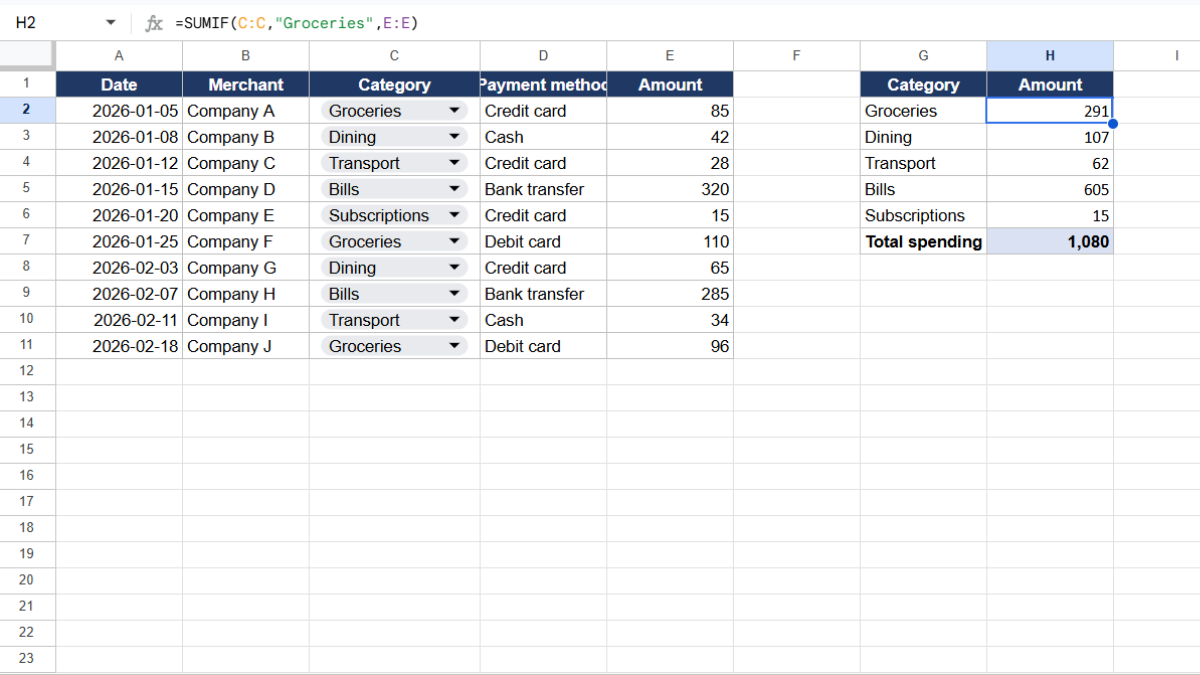
Set up a small summary off to the side. List your categories in one column, and next to each, total it with SUMIF:
=SUMIF(C:C, "Groceries", E:E)
Copy it down and change the category name for each. Now you can see, in real time, that dining out is quietly your biggest line.
For total spending, use:
=SUM(E:E)
How do you see spending month by month?
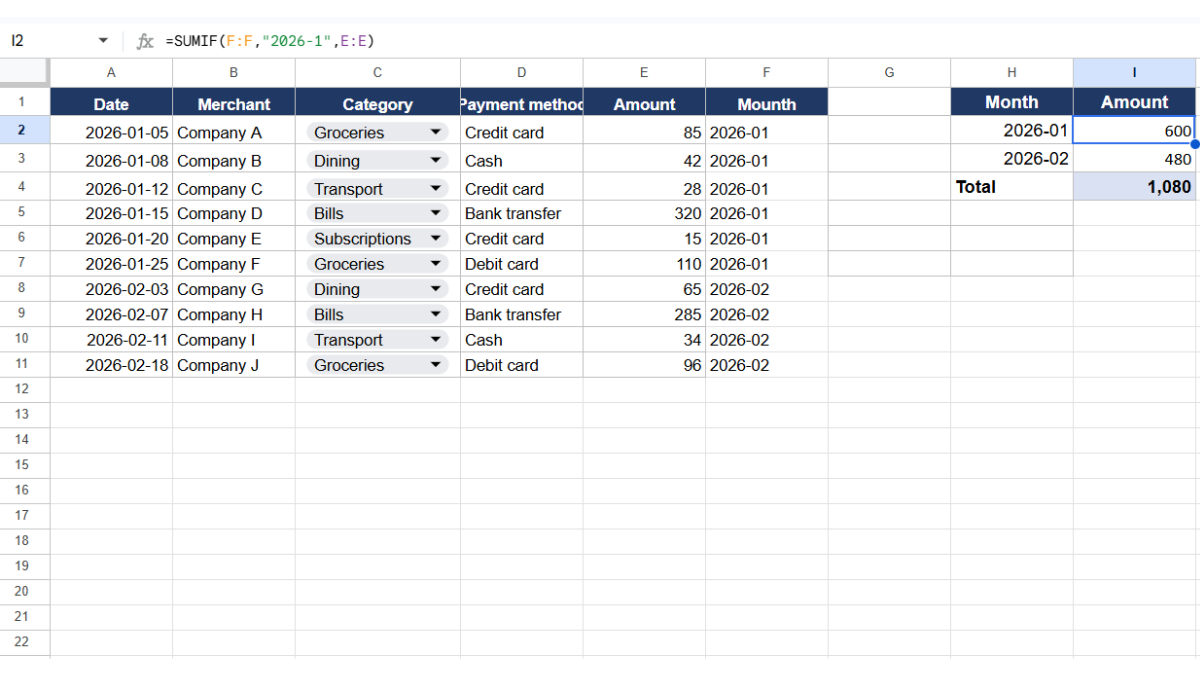
To compare months, add a helper column. In F2, enter:
=TEXT(A2, "YYYY-MM")
Drag it down. This labels each expense with its month, like 2026-01.
Now total any month with:
=SUMIF(F:F, "2026-01", E:E)
You can even chart these monthly totals: select the month labels and totals, then Insert → Chart for a quick spending trend.
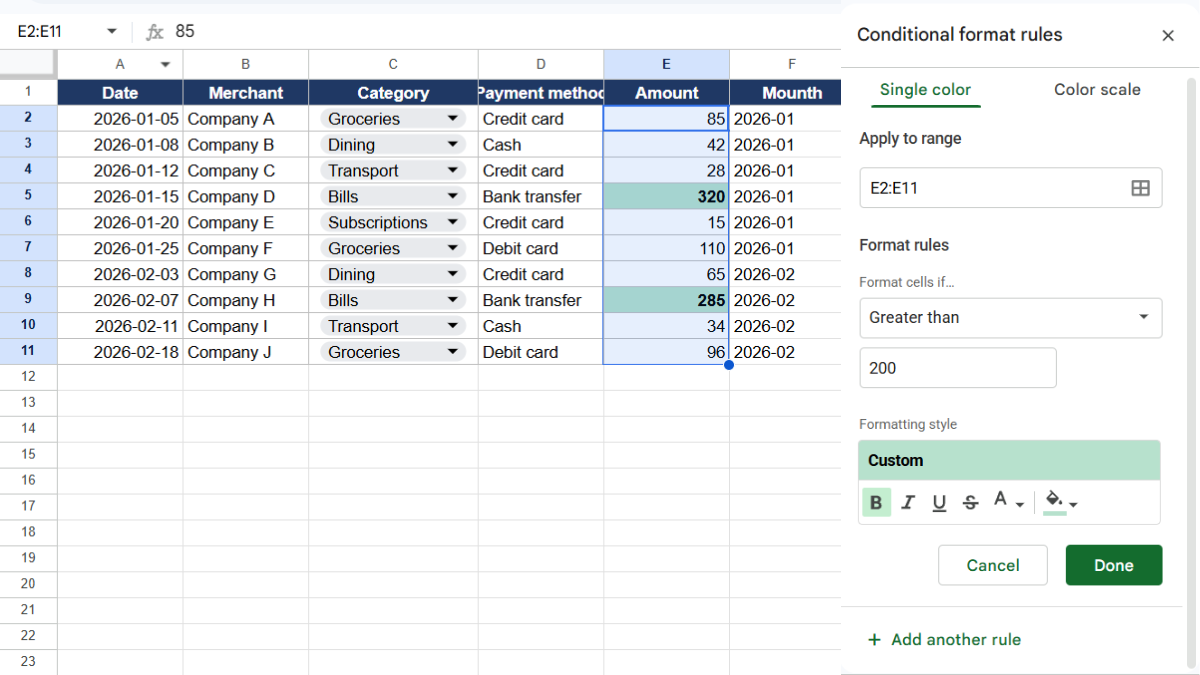
How do you make big expenses stand out?
Conditional formatting can flag anything worth a second look.
- Select your amount column.
- Go to Format → Conditional formatting.
- Choose Greater than and enter a threshold like 200.
- Pick a bold fill and click Done.
Now large expenses catch your eye without scrolling.
Where do the receipts go?
Here’s where a spreadsheet alone runs out of room. Your tracker says you spent $85 at a hardware store. Fine. But when your accountant asks for the receipt, or you need to expense it, the number can’t help you. The receipt is a photo buried in your phone, if you still have it.
That disconnect between the record and the proof is the real weakness of any expense tracker.
This is where UpSheet fits in. UpSheet is a Google Sheets extension, built by The Conductor, that lets you drag and drop files straight onto a cell. You attach the receipt directly to the expense’s row.
Snap the receipt, drop it on the row, and UpSheet stores it in a dedicated Google Drive folder for that sheet and marks the cell with a 📎 paperclip. When you need it, you click the cell.
Because expense trackers get sorted by date and category constantly, this is key: in TABLE mode, UpSheet keeps each receipt tied to its own row, so it never ends up attached to the wrong expense. Drag, Drop, Done.
Frequently asked questions
How do I make an expense tracker in Google Sheets?
Create a table with date, merchant, category, payment method, and amount, use a dropdown for categories, then total spending by category with SUMIF and overall with SUM. Add a helper month column for monthly totals.
How do I track expenses by month in Google Sheets?
Add a helper column with =TEXT(date, "YYYY-MM") to tag each expense’s month, then use =SUMIF(month column, "2026-01", amount column) to total any month. You can chart those totals for a spending trend.
Is there a free expense tracker template for Google Sheets?
You can build a free expense tracker in minutes using a simple table plus SUMIF, with no template download needed. To also keep receipts attached to each expense, add UpSheet, which lets you drag a receipt onto its row.
How do I attach receipts to an expense tracker?
Use UpSheet. Drag the receipt onto the expense’s row, and it saves to the sheet’s Drive folder with a paperclip marker on the cell, so the proof stays with the record even as you sort by date or category.
Organize Your Work, Simplify Your Life
Your spending belongs in Google Sheets. So do the receipts that back it up.
With UpSheet, every receipt sits on the row it belongs to, ready for tax season, reimbursements, or your own peace of mind.
Start your 14-day free trial. It works inside the Google Sheet you already use, so there’s nothing new to learn. Pro is $9.99/month (or $79.99/year) when you’re ready.