How to Build a Budget Planner in Google Sheets
Set up budget tracking in Google Sheets with a planner that compares budgeted versus actual spending, flags overspending, and keeps your bills attached.

Tracking what you spent is looking backward. Budgeting is looking forward: deciding where the money should go before it goes somewhere else.
Google Sheets is perfect for this. You set a plan, compare it to reality, and see the gap clearly enough to act on it.
This guide sets up budget tracking Google Sheets makes easy: a planner that compares budgeted versus actual spending for every category, and turns red the moment you go over.
Key Highlights
- A budget planner in Google Sheets compares what you planned to spend against what you actually spent, per category.
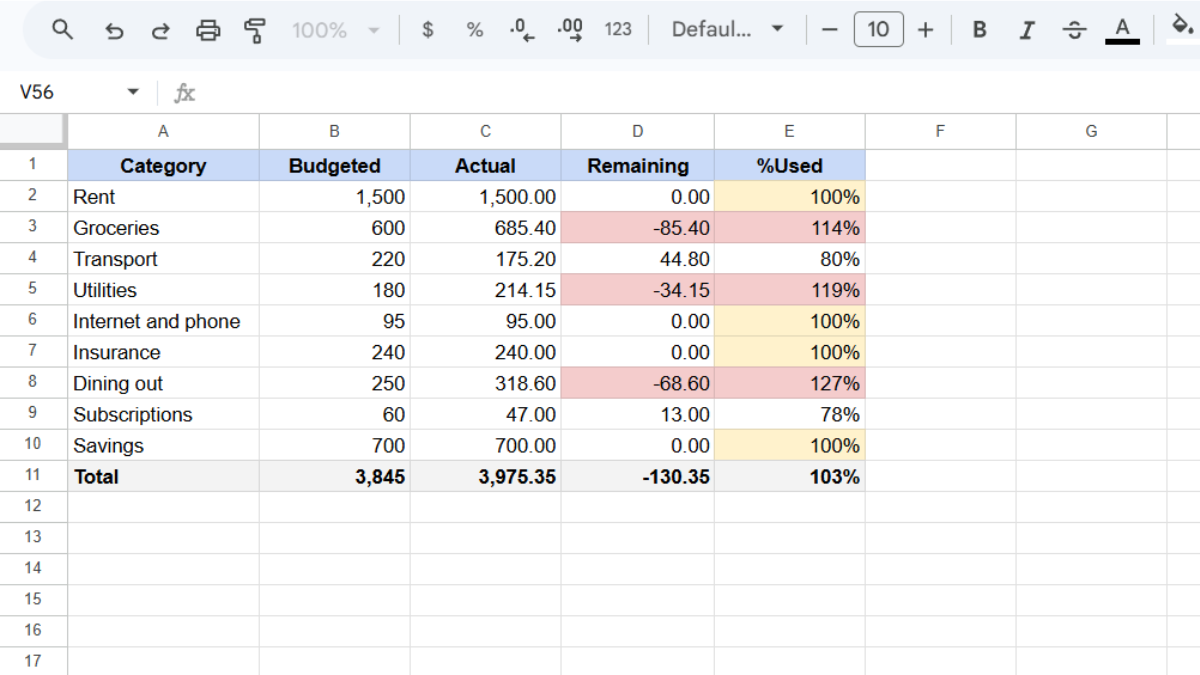
- The core is one table: category, budgeted, actual, remaining, and percent used.
- SUMIF can pull your actual spending straight from an expense log, so you don’t retype anything.
- Conditional formatting turns any over-budget category red on its own.
- A budget is a set of decisions, and decisions need context. UpSheet is a Google Sheets extension by The Conductor that lets you attach a bill, quote, or statement to any budget line, so the number always has the paperwork behind it.
What does budget tracking Google Sheets need to work?
A planner is a comparison table. Open a new Google Sheet and create these columns:
- Category (A)
- Budgeted (B)
- Actual (C)
- Remaining (D)
- % Used (E)
List your spending categories down column A: Rent, Groceries, Transport, Utilities, Savings, and so on. Enter your planned amount for each in Budgeted.
How do you calculate remaining and percent used?
Two formulas do the work.
For Remaining, in D2:
=B2-C2
For % Used, in E2:
=C2/B2
Drag both down. Format column E as a percentage (Format → Number → Percent). Now each category shows how much room is left and how much of the budget is gone.
Add a totals row at the bottom with =SUM(B2:B10) and =SUM(C2:C10) to see your whole budget at a glance.
How do you pull in actual spending automatically?
Typing your actual spending twice is a waste. If you keep an expense log in the same file, pull the totals in with SUMIF.
In the Actual column, instead of a number, use:
=SUMIF(Expenses!C:C, A2, Expenses!E:E)
This finds every expense whose category matches this budget row and adds them up. Now your planner updates itself as you log spending.
How do you flag overspending automatically?
You want an over-budget category to shout at you. Conditional formatting handles it.
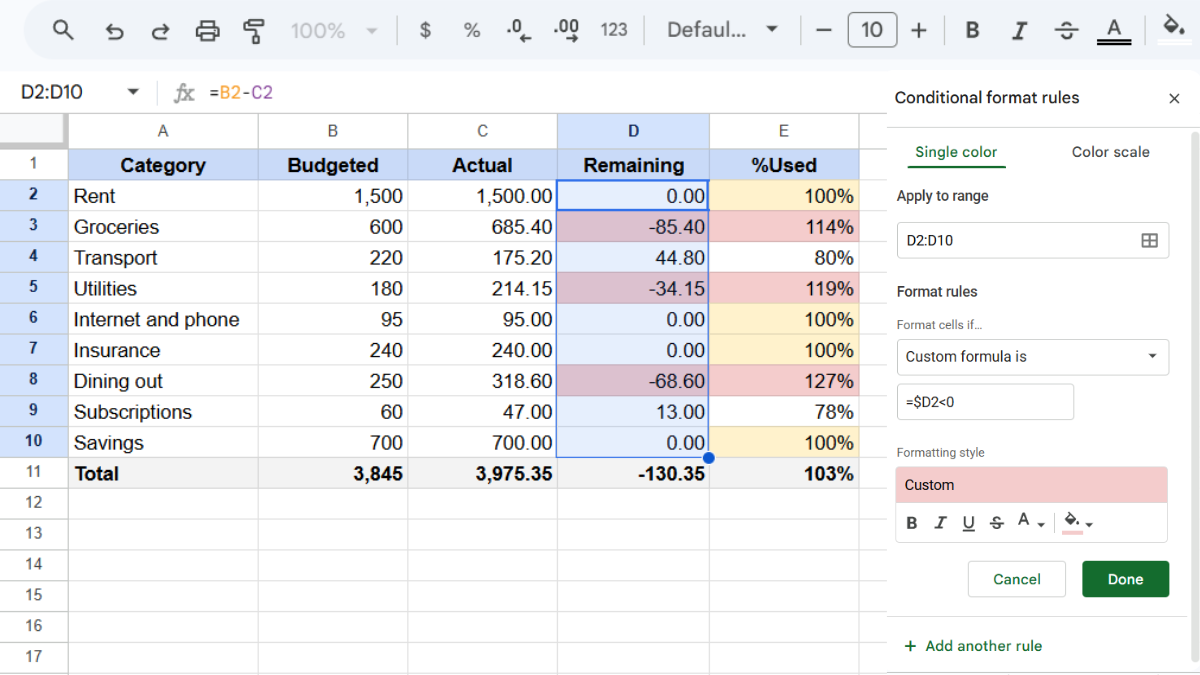
- Select your Remaining column (D2 down).
- Go to Format → Conditional formatting.
- Choose Custom formula is and enter:
=$D2<0
- Set a red fill and click Done.
Now the second any category goes negative, it turns red. You can add a second rule on % Used with =$E2>1 for the same effect.
Where do the bills behind the budget live?
A budget line is a decision, and decisions have paperwork. The rent figure ties to a lease. The utilities line ties to a bill that changes each month. The insurance number ties to a quote you compared last year.
Those documents justify the numbers, but they’re never in the sheet. When a figure looks off, you’re back to digging through email to find the bill that explains it.
This is where UpSheet fits in. UpSheet is a Google Sheets extension, built by The Conductor, that lets you drag and drop files straight onto a cell. You can attach the bill, quote, or statement directly to its budget line.
Drop the file on the row, and UpSheet stores it in a dedicated Google Drive folder for that sheet, marking the cell with a 📎 paperclip. When a number needs explaining, the proof is one click away.
In TABLE mode, UpSheet keeps each document tied to its budget line even after you reorder categories, so the paperwork never drifts. Drag, Drop, Done.
Frequently asked questions
How do I make a budget in Google Sheets?
Create a table with category, budgeted, actual, remaining, and percent used. Enter planned amounts, calculate remaining with =budgeted-actual, and use conditional formatting to flag any category that goes over.
How do I compare budget versus actual in Google Sheets?
Put budgeted and actual amounts in adjacent columns, then calculate the difference with =budgeted-actual. To pull actuals automatically from an expense log, use SUMIF to total spending by category.
How do I highlight overspending in Google Sheets?
Use conditional formatting with a custom formula. On your remaining column, enter =$D2<0 and set a red fill, so any category that runs negative turns red automatically.
Can I attach bills to my budget in Google Sheets?
Yes, with UpSheet. Drag the bill, quote, or statement onto its budget line, and it saves to the sheet’s Drive folder, so the paperwork behind each number stays one click away.
Organize Your Work, Simplify Your Life
A budget planner decides where your money goes. UpSheet keeps the bills and quotes behind those decisions, attached right to the lines they explain.
Start your 14-day free trial. It works inside the Google Sheet you already use, so there’s nothing new to learn. Pro is $9.99/month (or $79.99/year) when you’re ready.